Showing posts with label Growing tips. Show all posts

Sunday, June 5, 2011

Winter rhizome maintenance and pruning

Sarracenia produce all their new growth from a modified stem called a rhizome. Although rhizomes may not immediately look like a stem, they have all the characteristics of one - a growing tip or bud and secondary growth points or nodes that develop all the way along the stem. Depending on where the nodes are, and what the plant needs, they may produce either roots or new growing points. Because all growth comes from the rhizome, they need to be carefully maintained for full growth. The best time to do this is winter, when your plant is dormant and new growth can not be damaged.

Here is a photo essay of maintenance I perform on all my plants during winter.
Sarracenica flava var rugellii before being cleaned up for next spring.

Saturday, May 28, 2011

A handy hint for growing Albany pitcher plants

The Albany pitcher plant (Cephalotus follicularis) is an amazing and curious little plant endemic to south-western Western Australia. The appeal of this plant lies (of course) in its cute pitchers which are perfectly adapted to capturing ants and other small, crawing insects. Interestingly, it also produces flat phyllodes during winter that are not carnivorous.
 
Amazing as this plant is, it has a bad reputation for being tough to grow, beeing liable to die with little or no warning. The reason why these plants do this is now becoming known - they hate wet, stagnant roots. This more or less rules out using the tray method for watering the plant, but makes it difficult to provide consistent moisture to the roots. There is, however, an unbelievably easy way to grow this species.


Yep, that's it - self watering pots! The pots I use are the 27 cm square troughs sold by Bunnings. These pots work by capillary watering - they have a reservoir of water in the base and a false pot bottom that allows ample water to be drawn up through the soil to the roots as it is needed. It does not allow the roots to stay so wet that they rot. This system also allows plenty of air to penetrate the soil, while the size of the pot moderates soil temperature. All you need to do is keep some water in the reservoir to keep the soil consistently moist.


These pots have allowed me to grow Cephalotus successfully here in Canberra, including temperature extremes between -6*C in winter and 40*C in summer. I don't let frost form on them, though, and my plants are put in an unheated but frost-free greenhouse for the winter. Except for the self watering pots, my plants are grown under identical conditions to my Sarracenia - full sun and a soil mix of equal parts peat, sand and coarse perlite. The sand in the photos above is simply top dressing to stop the peat splashing over the plants and to keep the top of the pots as free from as much competition as possible. The only plants I let grow with them are pygmy Drosera, most of which are now gemmae waiting to sprout. I propogate all my plants from leaf pullings. As Cephalotus hate root disturbance, I strike all cuttings in cardboard or peat pots that break down in the soil and can be planted straight into a new pot without annoying the roots.


I grow two clones of Cephalotus at the moment, with another clone striking from leaf pullings. They can be slow to establish even in the self-watering pots, but once they are, they grow quite quickly. As evidence, the above plant has not put on much growth since I put it in the self watering pot last year. It is a Cephalotus that produces burgundy to almost black pitchers, so this might have something to do with its poor growth to date. The other, more green, clone has grown much more quickly.

Sunday, January 23, 2011

Depotting, division, rhizome maintenance and repotting (feat. rhizomes behaving badly!)

Completely re-written and updated with new photos, July 2015.

Sarracenia are best repotted in winter because they are dormant and you are less likely to interfere with their growth. But they can still be repotted in an emergency at other times of year – if you are careful.

They key points for successful repotting are, in this order:

  • Timing & preparation – avoid disturbing a growing plant unless its life is at stake, and make sure you have your gear together before you begin
  • De-pot carefully – slide the plant out gently or cut the pot off if necessary
  • Care for the roots – avoid causing damage by using a garden hose with a gentle rose spray to wash the old substrate away, or make sure the pot is soaked for at least 24 hours beforehand
  • Be a good surgeon – be gentle, make clean cuts with sharp tools, leave green growth on the plant and don’t over-divide the rhizome
  • Practice good hygiene – use gloves, sterilise your tools and gloves (or change gloves) between plants, and make sure you can isolate spent or diseased plant material
  • Invest for the future – use good quality substrate, choose an appropriate pot for your plant’s size and use good practices when repotting.

To show you how to do it, here is a step-by-step, illustrated how-to guide showing how you can repot Sarracenia.

A note in advance – some growers get results doing a lot less for their plants than I do. I personally believe that what you get out of something is proportional to what you put in, and in my experience it is the small things like being gentle with roots and burying rhizomes at the right depth make a difference. There is also the matter of karma – treat others how you would like to be treated. Ultimately, you will find what works best for you. The below has worked well for me for many, many years.

Timing
Timing is everything when growing plants. Do anything too early or too late, and your plants will not thank you for it. This is especially true for repotting, because when we repot, we are doing the equivalent of major surgery. Just as we would not respond well to major surgery without anaesthetic, Sarracenia do not respond well to being repotted while growing. Wait until they are dormant and avoid repotting a growing, active plant unless it is an emergency situation (e.g.. controlling rhizome rot). I usually repot my Sarracenia in May, June or July when they are well and truly dormant. By August, some Sarracenia may be preparing to put up flower buds.

If you need to repot out of season, do as much as you can to protect your plant. Plan your activity carefully so you can be in and finished as soon as possible without being careless. For example, if you need to intervene on a declining plant, try and figure out what is wrong before you cut the plant open. Look carefully to see if the rhizome is in trouble, and plan where to make your cut. Get your tools, pesticides, fungicides, medium and fresh pots ready to go. Then get in and do it quickly and carefully. When you are done, set the plant up for recovery by giving it fresh media and gentle conditions – protection from bright light and wind is crucial for at least a month. Just as surgery will set us back for a while – longer with major surgery – repotting out of season will almost certainly set your plant back at least one year’s growth. So avoid doing it unless a plant’s life is at stake.

An exception to this is depotting a plant to put into a bog garden. This can be done at any time of the year with care – try not to disturb the root system and again plan everything so it is over and done as fast and carefully as possible.

Preparation

It is a good idea to plan your repotting activities well in advance and make sure you have everything together. Finding out you are missing something halfway through repotting will result in stressed plants at best and dead plants at worst. A good idea is to have a checklist prepared before you begin. Here is an idea of what you could consider having ready before starting:

  • Dormant plants with dead leaves trimmed off and longer foliage shortened to about 20 cm (dead leaves and remnant pitchers get in the way fast and can cause damage)
  • Fresh pots (a headcount to give you an idea of how many divisions you expect is useful unless you have a really large collection)
  • Enough new media to fill the new pots, pre-mixed and ready to go (a clean wheelbarrow is a good idea, as is a cleaned, empty garden bin for storing media you have mixed)
  • New tags and a plant label pen (try your newsagent) or pencil
  • Sharp and cleaned secateurs (use the bypass type and not the anvil type. Anvil secateurs will guarantee crushed rhizomes that will be susceptible to infection or infestation by pests)
  • A clean trowel for scooping media
  • Robust disposable gloves big enough for your hands or robust, warm washing up gloves if it is very cold (trust me on that one!)
  • Pre-mixed fungicide and pesticide, just in case
  • A bucket or supply of garbage bags for waste
  • Large Ziploc baggies in case you are keeping rhizomes for someone or to sell
  • 10% bleach in a spray bottle
  • Hand sanitiser
  • Warm, waterproof clothing (chances are you will be doing this in the dead of winter)
  • A water supply, hose and trigger sprayer able to produce a gentle rose of water (but see root care and washing, below)
  • A place where you can wash used media off plant roots (try using an empty veggie patch or garden bed; this way you can improve your garden’s soil and lets you recycle)
  • Provisions for a hot drink, food and a warm place to rest up after you’re done – you will have earned it!

I’m sure there are more things you could add to this list, but its a good start.

Depotting
Because roots are rather sensitive structures, care needs to be taken when depotting any plant. Being too vigorous can be damaging to its health. When you go to remove a plant from its pot, the key is to slide the pot off gently. If the rhizome is wedged in or has deformed the pot, the easiest option is to use a pair of scissors to split the pot, bottom to top, starting with one of the drainage holes. Depending on how stuck the plant is, you may need to make a cut up each side of the pot. Making sure the soil in the pot is well hydrated beforehand also helps the soil to slip out.

You should make sure the plant’s label is legible at this stage and, if it is not, make up a new one. Make sure the label remains with the plant during repotting to avoid mistaken identity.

Root care and washing

Before we talk about root care, let’s take a look at Sarracenia roots. Sarracenia are often reputed to have underdeveloped root systems. While this is true relative to some plants, it does not mean they have negligible root systems – far from it.


This plant is not very big (left) but it has nonetheless developed a good root system. How big can Sarracenia roots grow?

root length

The S. flava at left has just been depotted from a 200 mm (8”) pot and its roots have made it all the way to the bottom. And this is a not very vigorous clone of S. flava var. atropurpurea! I’m very sure they can get longer than this…

Removing the soil from Sarracenia roots may seem straightforward, but peat and Sphagnum moss can cling to the rootstock of Sarracenia very tightly, especially when plants are getting very large and have extensive root systems growing every which way from branching rhizomes. Old medium can also start to break down and stick to roots like glue.

I generally use water to wash the soil off the roots, a process that seems not to stress the plant so much. All you need is a hose with a trigger attachment that produces a gentle rose of water, a new pot (chosen using the guidelines above) and adequate soil media pre-prepared. Start by removing all dead growth from the leaves. Don't do the rhizome yet - just trim off any dead leaves, making sure as much live growth remains as possible. I tend to trim the leaves to the same height for a neat and tidy appearance, but make sure there is enough there to allow them to be easily removed. Leaving a good few inches of leaves also insulates the rhizome from cold and allows the plant to keep on photosynthesising.

I would avoid manually removing soil with your fingers, as this tends to stress the plant far more. We are going for happy plants, and it is the little things combined that make the difference between fair and outstanding plants.

Here are some examples of what well washed rhizomes can look like. Perlite can be very difficult to remove from roots – as can Sphagnum, so it you remove most of it, don’t worry about a few bits remaining. You risk damaging roots if you get too fussy.

cleaned 

If it is not practical to wash roots where you are (e.g.. in an apartment), another alternative is to fill a bucket with water and lower the root ball into the water. The media should disintegrate and gentle washing with your hands will help dislodge the rest. Exceptions are old media (which can be like thick mud) or old, compacted Sphagnum moss. One grower I knew used to compact Sphagnum in so tightly that I found it stubbornly clinging to plants I brought from him two repotting cycles later! You will still need to dispose of the waste, though. When I grew Sarracenia in an apartment, I used to let the bucket settle for an hour or two and decant the water off before disposing of the waste media.

Once you have washed the media off your plant’s root system, you are ready to divide.

Being a good Sarracenia surgeon – the inns and outs of division

When you divide a Sarracenia, remember that you are performing plant surgery. The success of your patient will depend on how gentle you are, how and where you cut, what you do and don’t remove from the plant, and, importantly, your hygiene (see below).

Your cutting technique is important, just as it is for surgeons. To make a good cut, insert the blunt end of your secateurs into the branch of the rhizome, right where you want to cut. Line up the blades along the angle you want. Then use a deliberate and firm motion to make the cut. If your pressure is too hard or too soft, you can damage the rhizome. The idea is to make one clean and crisp cut. Multiple cuts will create uneven incisions and can damage your plant, or worse, leave an ideal site for infection or infestation.

Start by stripping spent growth from the cleaned rhizome. Doing this gives you a clear idea of what the rhizome is doing and an idea of when and where you will need to divide. To strip a rhizome, remove dead leaf bases and remaining soil by pulling downwards and backwards. The leaves are attached by structures called scales, which have winged flanges that straddle both sides of the rhizome and attach at the rear. They are starchy and probably store energy. Dead ones feel like very stiff cardboard. By gently pulling down and backwards, they will peel off cleanly. Avoid pulling live scales, otherwise you will likely deplete your plant’s winter reserves. Only remove them in numbers if there is something serious going on, like an infestation of mealybug or scale.


Speaking of pests, here are some signs to keep an eye open for. In winter, you may well only find eggs or immatures. At left we have mealybug eggs that have been laid between scales, and at right sooty mould caused by mealybug feeding activities. Sooty mould grows on sugary excretions from sucking insects (Hemiptera, including mealybugs). Click here to see an active infestation on a growing plant.

Flower stalks are more stubborn because they are attached to the rhizome via a much broader base. Be careful when removing them; it they resist it is best to trim carefully with secateurs and leave them if they are hard to access.

Voila, here is a cleaned rhizome, stripped of its dead growth.

Once your rhizome is stripped, you need to check the rhizome’s health. Examine it closely for signs of dead or rotting tissue, and signs of insect infestation.

dead growth point

In some instances, dead rhizome tissue stands out like the proverbial sore thumb, like this. Others are less obvious.

Dying rhizome  dead rhizome tissue_1

This plant had a dying growth point, so I removed it (left; not rot inside the rhizome). In doing so, I felt that the main rhizome was mushy to touch, indicating it had rotted and was already dead. It will need to be removed. To find where to make the cut, use a fingernail or the tip of your secateurs to take very small scrape biopsies of the rhizome. Do this by gently scraping the surface of the rhizome with a fingernail or a blade of your secateurs. If you are really sure the rhizome is dead, like in this case, you can gently break it open.

Dying rhizome

If the underlying tissue is still brown, clean your nail or secateurs and scrape again a little bit further on. Repeat until you find clean white tissue, and make your cut just ahead of your last biopsy site.

Gradient

On this rhizome, the rot was actually inside the rhizome and extends well beyond where I have already cut. Here is a cutaway view showing how the rot was penetrating the rhizome.

clean rhizome

Keep taking slices off the rhizome until you hit clean tissue, which looks will look brilliant white, as shown above.

This S. alata rhizome shows a contrast in colour between healthy rhizome at top and discoloured but obviously not dead rhizome below it. However, the discolouration is probably due to a pathogen (likely a fungus) killing the rhizome. It is worth removing to be on the safe side.

With the rhizome trimmed, you can finally consider whether you even need to divide your plant. Do this by counting the growth points and examine how much rhizome is present. The aim is to make sure you leave at least two growth points per division with as much rhizome as possible. Take your time and plan how you will divide.

Here’s a couple of examples:

Here’s our friend again (actually a S. flava var. rubricorpora) with perlite stuck in its roots. It only has two growth points, so it would be best not to divide. The rhizome, however, has hooked under at the back, so it should be trimmed a little. I took this photo back in 2011 and made the mistake of dividing it. It sulked for years as a result and is only now getting itself back together.

Example division 1  Example division 2

Here is another Sarracenia, in this case a robust clone of S. flava var. rubricorpora. This rhizome is very branched, with multiple growth points per branch. It can safely be split. So, let’s begin.

I call the next few pics…

Rhizomes Behaving Badly!

Overcutting growth point on rhizome    Example division 2_undergrowth_cut shown

Sarracenia rhizomes get up to all sorts of mischief that is hidden by the soil. This rhizome shows a classic case of Sarracenia behaving badly: one growth point is growing over the top of, or overshooting, another pair of growing points. This will result in deformed pitchers and twisted rhizomes if not corrected. To remedy, remove the overgrowing portion. I would follow the dashed line shown, above right.

Example division 2_undergrowth_cut made  Example division 2_undergrowth_removed

Voila! Cut made (arrowed, left) and (right) overshooting top growths removed.

Undercutting growth point

The inverse of an overshooting growth point is an undershooting growth point. In other words, the growth point grows up from underneath the main rhizome and cuts in front of other growth points, like this. No-one, including Sarracenia, likes a queue jumper, so this bad rhizome behaviour will also need to be corrected. To fix, you will need to cut the offending lower growth point off the main rhizome from underneath.

Side growth removed

Above is the main type of division you will have to contend with – splitting side growths from the main rhizome. Note I left as much rhizome as possible for the main growth point. Note also the pair of “eyes” or new growth points on the main rhizome behind the two cut sites (exposed white tissue). If you are careful, they will produce pitcher this year, but damage them and chances are they will abort.

What other types of rhizome craziness can you expect to see? Here are some examples.

Note - expect to see new pics added over time as I find good examples, or feel free to email in examples of your own (credit will be given, or not, if you so desire)…


This is what you are likely to face if you have brought a mature plan that has been crammed into too small a pot for too long. I brought this Sarracenia flava var. flava back in 2010 from a grower who should remain anonymous for such plant abuse. They had crammed this mature rhizome into a 120 mm (about 5”) pot for, by my estimation, four or more years. The poor plant has tried to divide itself and the pot has forced the new growth underground! If I had left this plant alone, the new growths would likely have rotted or deformed the pot with deformed underground pitchers. At the other end of the plant, the rhizome has been forced underground at a 90* angle from the pressure exerted by the growth point at the front. Also note the large number of dead roots and relatively small amount of potting mix. To fix this, I trimmed back the rhizome (which was dying at the tail end), cleared as many dead roots as I could, and did my best to turn the underground growth points into new divisions. The plant recovered well, including the new divisions.

A slight modification is needed for dividing prostrate plants like Sarracenia purpurea and S. psittacina. These species (and their hybrids) don't tend to branch so much, so just try to take a small clump of several growth points with a good amount of root system. These species (and many taller Sarracenia) can establish successfully from even a single root (and sometimes no roots), so if you accidentally break off too small a piece, pot it up with a larger cutting and see what happens. Upright Sarracenia growth points without roots can be on-grown if you care for them well, so they are worth a try too.

As with anything, experience is the best teacher. I have divided so many plants that my assessment of when and where to cut is pretty much automatic now. But I hope this example helps.

As you create new divisions, assign a new label with the name of the plant on it to each division. This way you know exactly what plant you are dealing with.

Practice good hygiene 

If you found pests on your plant, this step is when you reach for the insecticide. It is important to be prepared and have some pesticide and fungicide pre-mixed and ready to go before your start. I have found that the Rose Gun premix works well. Readily available (even from Coles or Woolworths!),  it combines contact and systemic insecticides and a systemic fungicide. More importantly, it has never harmed my plants. Make sure you read the label before use – it is there for your protection because most pesticides are nerve agents that can and will hurt you if you don’t treat them with respect. It is also there to guide you on what rate of chemical use will be enough to kill insects. Don’t be tempted to underdose, as it will encourage insects to develop resistance, rendering your treatment useless. Resistance is a serious issue for humanity, as we are literally running out of treatments for some insects, especially the Wester Flower Thrips (Frankliniella occidentalis). Every little bit helps, so do your bit for global food security – there is mounting evidence to suggest some instances of pesticide resistance developed because one grower did the wrong thing. You can also try rotating pesticides to avoid insects developing resistance to any one chemical.

If you did find insects, try and keep affected/treated pots separated after you have finished repotting them. Quarantine can help you contain and treat the infestation.

Chemical pest and disease control is part of hygiene, but only a small part. Good hygienic practices are important for horticulture, but sadly a lot of guides on carnivorous plants overlook this. Poor hygiene will allow pests and diseases to spread easily and quickly through your collection, especially because a newly divided and repotted plant is at its most vulnerable, and undermine any chemical control.

Here are some more general pointers for good repotting hygiene practices:

  • Gloves: just as you would expect a surgeon or doctor to use gloves when examining you, use them when handling your Sarracenia and change them or sterilise them thoroughly between plants. Not doing so is an easy way to spread pathogens, both between plants and from plants or soil to you.
  • Tools – the most efficient way of spreading pathogens through your collection. Make sure your tools are sharp and sterilise them between use. Bleach works but it may be better to use a diluted methylated spirits in a spray bottle instead, as bleach will rust steel quickly and ruin secateurs. Make sure you soak the tools thoroughly before moving on.
  • Bleach – if you are working in very cold conditions and use dishwashing gloves to keep your hands warm and functioning, you will need a 10% bleach solution in a spray bottle to sterilise your gloves between plants. Hand sanitiser can also work, but is more expensive.
  • Masks – sporotrichosis is an issue if you use dried Sphagnum moss – read what Barry Rice has to say about this human disease here. It is not something I have ever had to deal with because I only use live Sphagnum, but as Bunnings now only uses dry moss, it may be an issue in the future.
  • Secure waste material – it is pointless if you go the effort of cleaning rhizomes, which helps remove insects and fungal spores, if you don’t secure it. Unsecured waste can contaminate your freshly repotted plants, taking you back to square one quickly. Have a bin or a large and robust garbage bag handy for all your waste, including plant material, old pots and used gloves.
  • Hand sanitiser and soap – make sure you wash your hands liberally when you are done repotting, as it will protect you against microbes from the soil.
  • Shower – as much for your mental wellbeing as your health. Chances are you will find yourself repotting in the dead of winter and probably on one of the coldest days of the year. Invariably, I would pick a weekend to do my plants that would turn out to be horribly cold and windy. Nothing cleans you up and makes you feel better than a hot shower after subjecting yourself to such torture as working with wet peat on a cold or freezing day!

Now we have our cleaned, trimmed and divided rhizomes, written up new labels and secured waste, we can repot.

Invest for the future with good media, good pots and good repotting practices

Although I now grow in bog gardens, I spent a lot of time and effort figuring out what pots worked well for me. You can read about that by clicking here. In brief – happy Sarracenia can extend their rhizomes by an inch or more every year. Cramming them into a pot just bigger than the rhizome is not a good idea, because you will have to repot more frequently and stress your plant out more often. We have already seen how rhizomes can do strange things in small pots (see Rhizomes Behaving Badly, above).

As a rule of thumb, put a rhizome into a pot with a diameter that is no smaller than three times its length. This will give at least two seasons of growth. For me, I found that 200 mm (8”) pots work well for mature rhizomes (> 25 mm width or > 50 mm length). Bigger pots work well for multiple rhizome plantings; see the ICPS page for planting Sarracenia in planter boxes for details. Smaller rhizomes are best left in pots no smaller than 140 mm (6”) and moved on when they get too big. Exceptions are when you live in an area with hard water, in which case you will have to repot more often and can get away with smaller pots. Trial and error will help you to figure out the best pots for you.

The type of pot you use is also important, and a detailed discussion is given here.

Also, choose good media and have it prepared in advance. Avoid bags that have been split open or repaired, as it is an easy way for them to be contaminated with other soil, manure or pathogens. For beginners, make sure you have the right type of peat, and not a additive mixes like Pot ’n’ peat, or substitutes like coco peat or sedge peat. You need genuine Sphagnum peat moss, preferably from a sustainable operation. Make sure whatever medium you do use is also pre-wetted before your repot your plants into it.

Before putting any soil into the pot, make sure it has been well wetted – again, preparation is important. I pre-fill my pots by making a sloping mound out of the medium, as shown above.

Now, take some time to consider how the plant will likely grow, remembering it will be another 2-4 years before you will be repotting it again. I do this by holding the de-potted plant in the empty pot and position it so that the end of the rhizome buts against the back of the pot, positioning the growth points into the centre of the pot. You may need to adjust the direction the growth points face for best results, as you want to maximise the area into which each can grow. Doing this will allow your plant plenty of room to divide in coming years. Once you are happy with how you will position the plant, spread its roots so they fan out over the top of the mound you have created and hold the weight and position of the rhizome. Spreading the roots like this will help keep the plant upright as it establishes itself, which is especially important if you live in a windy area like I do (our spring winds have blown newly replanted/repotted Sarracenia over). You may need to add more medium to make sure the plant is well supported.

rhizome depth

Before you fill the pot up with media, take a look at the colour of the growing point. It will probably go from pigmented to white, with a very clear demarcation line, as shown above. The white parts of the growing point were underground before we removed to plant from its previous pot. Make sure you cover all white tissue with peat when you repot – up to the dotted line in the image above – while keeping pigmented tissue above ground. This will help the plant re-establish itself quickly and not waste energy deforming the rhizome to the right depth. Some plants will sulk for years until the have buried themselves again. Sarracenia minor in particular always behaves like that in my experience. Its the little things like this that go a long way towards producing a truly happy and well-grown plant.

When you are happy with how the plant is positioned, go ahead and fill the pot, making sure the rhizome remains positioned the way you want and is upright. As you fill, gently firm the medium into position. You don’t need to press so hard the medium becomes compacted. It should be firm but still light and airy. Fill to just below the brim and insert the label. Then, settle everything in by watering the pot with a gentle rose of water. Be careful not to wash soil from the pot. Once water flows from the bottom, return the freshly potted plant into its water tray.

Congratulations, you have repotted and divided a Sarracenia successfully. Repeat as necessary until your collection is rehomed.

Now go have a hot shower and relax with a hot drink (or something stronger if needed). Your plants will thank you for your care in the coming seasons.

Read more about How to Grow Sarracenia to perfection by clicking the link.
Saturday, January 22, 2011

How to grow Sarracenia to perfection - pots and soil

***Photos to come after the next repotting***

Summary - Healthy roots and rhizomes make a healthy plant. Make sure you give your Sarracenia an acid soil able to hold both water and oxygen, and also enough soil in the right type of container to promote oxygen exchange and room to grow for as long as possible.

Because we grow Sarracenia for their leaves and foliage, we tend to overlook or even forget the roots and rhizomes. Many people see them as boring, esoteric things that get a quick glance at repotting, and never again. The reality is that giving Sarracenia roots the conditions they need to grow well will give you a much healthier, hardy and beautiful looking plant. Because root care is probably the most complex topic I'll cover, I've split it into sections:
  • About Sarracenia roots and rhizomes...
  • Root health
  • Soil media
  • Container choice
  • Repotting
  • Rhizome health
About Sarracenia roots and rhizomes...

The difference between roots and rhizomes is something not often touched on in the CP literature. In short, a rhizome is a branch modified to grow on or through the soil. This branch, just like a conventional one above ground, has growth points or nodes from which foliage or roots grow. Which is produced depends on a complex set of interactions between plant hormones.
 
As for the roots themselves - their purpose is to anchor plants in the soil and to absorb water and minerals dissolved in the water. Sarracenia produce roots that branch multiple times, eventually dividing into very fine hair-like structures (appropriately named root hairs!) that do most of the roots' work. Unlike other carnivorous plants, Sarracenia have relatively large root systems that can cover a lot of soil. They also appear to be quite efficient at absorbing nutrients - plants treated with dilute osmocote as seedlings can be grown to flowering size in as little as 3 years, while unfertilised plants need 5 years or more! Messing with roots of long-lived plants like Sarracenia too often can stunt their growth and set them back many years, so it is important to treat them well from the onset. The root hairs in particular are very fragile and can take some time to regenerate, time in which the plant cannot access water efficiently and is therefore stressed.

Root health

To be truly happy, Sarracenia roots need to be kept in an acidic environment that is both wet and well oxygenated at the same time. To achieve these conditions, care needs to be taken in choosing appropriate soil media and pots - things that need to be considered in tandem for reasons outlined below. Provision of water is a separate condition that will be treated separately.

Soil media

Getting the soil media right for Sarracenia is half the battle as far as looking after their root systems is concerned. A good media is something that is acidic, holds water but is also well drained and allows good penetration and exchange of oxygen from the atmosphere. The media suggested by most CP books achieve these to varying degrees, but all have either of two things in common - they are based on either peat or Sphagnum moss.

Peat and Sphagnum are closely related - peat is merely the substance produced when live Sphagnum moss gets buried by new growth and rots in an oxygen poor environment. Sphagnum moss itself generates very acid conditions because it continually releases hydrogen ions into the environment while living. The hydrogen ions then turn the surrounding environment very acid. They are both great for use as growing media components because many Sarracenia naturally occur in Sphagnum-dominated habitats.
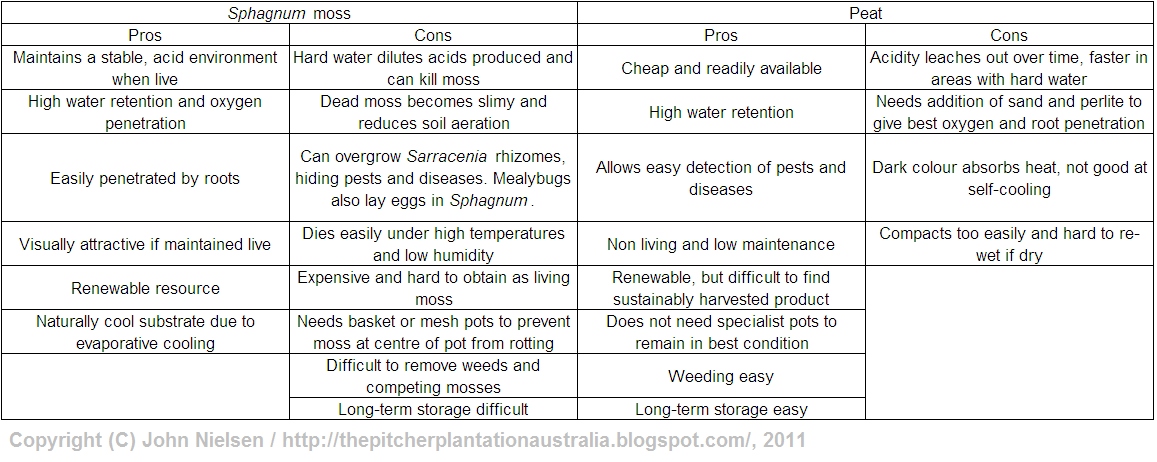
There are pros and cons to using both peat and Sphagnum. They are:

As you can see, Sphagnum has some great pros, but also some very prohibotive cons. It is somewhat fussy in its requirements, dieing easily if the humidity is low or the pot dries out briefly. Hard water also kills it when minerals in the water react with the acid and form a buildup on the moss' surface. This buildup eventually smothers the moss and kills it. Dead Sphagnum can also decay into a slimy mess that prevents oxygen reaching the roots and can promote pests like nematodes.

The problems with Sphagnum can be overcome if you are prepared to use shallow orchid or waterlilly basket pots with mesh sides, and keep the pots sitting permanantly in relatively deep water in cool, humid conditions. Unfortunately, these conditions can be hard to provide in some parts of Australia. But the true disadvantage of Sphagnum is that it makes it very hard to see pests such as scale insects and mealybugs (especially the latter, which can get into the Sphagnum itself!), and treating them chemically can kill the moss. Weeding is also nigh on impossible, especially if you get a herb that spreads via rhizomes or stolons. Fertilisers with high phosphorous ratios will also kill Sphagnum by smothering them in algal growth, although a low phosphoroust fertiliser will not affect Sphagnum noticeably. In short - if you can grow Sphagnum well, it is a great medium to use. But if you can't, it is generally wasteful to rely on it.

In comparison, peat moss is easier to deal with, mostly because it is a dead medium. It is cheaper than Sphagnum, but some of the lower cost is absorbed by the cost of sand and perlite needed to maximise soil aeration and root penetration properties. Peat used on its own can compact too much to allow adequate aeration and can also disrupt good root growth. It provides most of the properties of Sphagnum (water retention and acidity), but it does tend to leach acidity over time, especially if hard water is used to water the Sarracenia. In such a situation, you don't really have much of a choice but to repot as frequently as needed to keep the soil in good condition.

In making up a peat mix, you also need to consider the type and amount of sand and perlite needs to be mixed in. Sand should be as coarse as possible and not alkaline - test this by filling a glass with vinegar and sprinkling in a small amount of sand. Alkaline sand will produce bubbles for some minutes as it reacts with the vinegar, whereas inert sand will not fizz at all (but may release air bubbles trapped between grains). Perlite should also be as coarse as possible - it is simply inert volcanic ash that is superheated until it pops like popcorn. If you have hard water where you live, I'd suggest using more peat and sand than perlite to get as much acid from the peat as possible. If water hardness is no issue for you, then equal parts of peat, sand and perlite will give you a fluffy, acid mix that holds lots of water but is also aerated. Such a medium is perfect for promoting fine root growth, and will do much for creating a hardy, beautiful plant.

Container choice

Pot choice is something that has been touched on by only a few CP books (The Savage Garden being the best - forget everything Slack says about pots for Sarracenia in his Carnivorous Plants, his text in Carnivorous Plants and How to Grow Them is more reliable!). Despite this lack of attention, pot choice is something that will pre-determine how well your plants grow. The type of medium you use for your plants will also largely determine what type of pot you should use for your plants.

Pot type is the first consideration. If you use Sphagnum, I'd strongly recommend using waterlilly baskets or orchid pots with mesh sides. Because Sphagnum needs high water availability if it is to do well as a medium, choose squat pots - because the mesh sides allow air penetration, deeper water can be used without affecting root growth. Only the top layer of Sphagnum will grow if you use a conventional pot, making it more susceptible to being killed by low humidity or hard water.

If you use a peat medium, conventional solid-walled pots are perfectly fine. Unless you use solid-walled foam boxes as water trays, use a light coloured pot - foam boxes are great for water trays because they insulate the pots against the sun. Standard height pots are fine for pots up to about 200 mm (8") in diameter. Anything larger will need to be a half-height or squat type pot to keep an acceptable water table.

Pot size is also important. Adrian Slack's first book (Carnivorous Plants) suggested using a maximum pot size of 140 mm, advice that has somehow ingrained itself into many long-time growers. This is likely because, for many growers at least, 120-140 mm pots work well for the most part. For one, they don't let plants get so large that their rhizomes start to rot out. Second, for some strange reason, tightly potted plants seem to do very well, despite their large root systems.

Although Adrian later recommended much larger pots, this later advice never really stuck. The advantages of using a larger pot are more room for root and rhizome growth, more stable soil temperatures (small pots heat up fast), better water availability and better ozygen penetration to the root zone. Unfortunately, how big a pot you can safely use is not something I can tell you. It is something you need to find out for yourself under your own growing conditions. Start off with a 120 mm pot - 140 mm if it is a bigger plant - and see how big it grows before it needs to be divided. You can generally tell a plant needs to be repotted and divided when parts of the rhizome start to die off. Just make sure you don't let your plant rot out!

Back to How to grow Sarracenia to perfection

How to grow Sarracenia to perfection - about dormancy

Sarracenia during dormancy, with summer growth removed:

Dormant greenhouse

The same plants in full growth, taken a few months earlier.

Greenhouse_full growth 
Sarracenia avoid the harshness of winter in the cool temperate climate of North America by halting growth and waiting until the cold has passed. This behaviour is called dormancy. In plants, dormancy is triggered by changes to day length with the seasons, not by cold. The cold itself does not play much of a role in starting dormancy, but it can keep plants dormant once dormancy has started.
A tray of dormant Sarracenia flava in my greenhouse. Note the traps are dying off from the cold - this photo was taken after a week of frost at the start of winter.
Depriving Sarracenia of a good dormancy (ie. forcing them to grow year round) will cause them to grow weakly because of stress. It does not seem to be possible to kill Sarracenia by cold in Australia, but it is possible to kill them if they don't get good changes in season. Dormancy for Sarracenia grown under Australian conditions always begins around the autumnal equinox, and starts again after the winter equinox if temperatures are warm enough. I am not aware of any research that has identified the exact triggers for Sarracenia, but I think it would be a really interesting topic to study. It is interesting to read that Sarracenia in the tropics (Singapore) can start to enter dormancy by themselves at the height of the monsoon season - possibly because the dense cloud cover increases the amount of far-red light, which also occurs as days become shorter in autumn.


Sarracenia trimmings – these were taken a little early to try and stop a mealybug infestation.

Dormancy may seem a boring time for those growing Sarracenia, but I think it is a really important stage in their growth cycle. It is when all dead and dried parts of the plant can be removed, but it can be a good idea to leave some leafy material on plants if you live in an area that gets many winter frosts. The remaining vegetation seems to act as a blanket, trapping slightly warmer air stopping the really cold air from burning the live tissue in the rhizome. Late winter is also the time to repot your plants.

How to grow Sarracenia to perfection - about growth patterns

Different Sarracenia species produce pitchers at different times of the growing season, with only a few species producing pitchers at a more-or-less constant rate. In some species, pitcher production can also be affected by humidity and temperature. Understanding these patterns can help you choose the right combination of species to ensure a constant display, and also produce better looking plants. It also helps you to choose the best performers for your climate.

Thursday, November 25, 2010

Pot sizes - size does matter for some things

One aspect of Sarracenia growing that is very often overlooked is what size pot to use. A lot of people I know use 12 cm or 14 cm pots almost exclusively - as did I - mainly because this was the advice given by Adrian Slack's first book, Carnivorous Plants. Here's one reason why I changed to bigger pots:


This plant is a Sarracenia flava that fits somewere between var. flava and var. ornata - its veined at any rate. I brought it about 6 months before the photo was taken from a carnivorous plant grower in Sydney that shall remain nameless. Just look at how cramped the poor plant is - the pot it was removed from (shown for scale) was 10 cm (4 inches) in diameter.


The second reason I changed is because of the speed at which the plants grow. Repotting plants every two years or less doesn't seem to let the plant settle and grow to its full potential - they just get over the last repotting and you are repotting them again. I am trying out 20 cm (8 inch) pots - they look just big enough to get in a few years of growth before repotting will be needed. Some other growers I know use even bigger pots, and grow some really stunning plants. Some more experimentation is in order...

Thursday, November 11, 2010

Focus on: Sarracenia flava var. atropurpurea

Sarracenia flava var. atropurpurea is the all red form of Sarracenia flava. The maroon red colour and elegant curves of the pitcher give this plant some serious allure - grace, class and elegance. It has a well-earned reputation for being a finicky plant in cultivation - if it is not happy, it sulks by loosing the red from the pitchers. Growth of the pitchers is not necessarily affected, just the colour. The reason it does this is not known. My theory for the colour loss is that any abrupt change to the growing causes the plant to go into survival mode by loosing its pigments. In plants, red pigments act as a sunscreen that block out excess light and keep photosynthesis at a level suitable for the plant's growth rate. When we move a cultivated plant, the conditions it experiences change very sharply, as would happen if a plant is moved by a flood or dug up by an animal. Such things are major issues for a plant that would threaten its survival, and see the plant want to store as much energy as possible to re-grow. Removing the red pigments would be one way of storing up more energy for the rest of the growing season. Just a theory, but it seems logical...

I have got good results with the three clones of var. atropurpurea that I grow by trying to minimise as much disturbance to the plant as possible. I repot well before the plants break dormancy and start growing - dormant plants seem to be more tolerant of disturbance than ones that are growing. When repotting, I also use a gentle rose of water to wash soil from the roots, rather than remove this by hand. I also leave the plants be for the entire season once they start growing -so no moving the pots. A large pot will also allow these plants to grow undisturbed for as long as possible. I am thinking of using pine needles to keep the peat acid and make it last longer and increase the time between repottings.

As for the clones I grow, two have been up for a month now, while the other one is only opening its pitchers today. The best plant I have is one from Fly Free Zone in Queensland called "FRT 1-1". It is more vigorous than the other clones I have and makes very ornate, intensely red pitchers with a big mouth. The photo below is of the first pitcher of the season, which has not completely coloured up. The second pitcher of the season is already becoming darker in the pitcher tube, so it should be magnificent. This plant is also interesting in that its flower has a slight tinge of pink to it - this, and the concentrations of red pigment in the lid, suggest one of its ancestors was a S. leucophylla. I class it as a flava because of the flower and pitcher morphology - the issue with interfertile plants is often where to draw the line of defining a species.


 Sarracenia flava var. atropurpurea "FRT 1-1" - pitcher and flower

One of its siblings, "FRT 1-5", starts life as a flava var. cuprea lookalike, but soon becomes solidly red. Interestingly, this clone gets the cut throat of flava var. rugellii, something I have not seen in other plants. It has yellow flowers typical of S. flava. Both it and FRT 1-1 came from a batch of Sarracenia flava seed of unknown provinance sold by the late Fred Howell.


 Sarracenia flava var. atropurpurea "FRT 1-5"

The third clone I grow came from Phil Reytter at Lithgow. It gets solid maroon pitchers, but is a much more slender plant that is also slow to grow. Others have has issues with this clone keeping its colour, but stabilising it over a couple of seasons will help. Despite repotting, my plant has come up with the best pitchers yet - I'll post photos once the pitchers open and reach their potential.